4. Collect
- 4.1 Introduction
- 4.2 Single Set
- 4.3 Multiple Sets
- 4.4 Index Crystal
- 4.5 MAD Data
- 4.6 Load, Save & Copy Parameters
- 4.7 IuS options
4.1 Introduction
When pressing the "Collect"-button in the main window, the layout of the main window's buttons will be modified and you will obtain the following choices.
| Menu | Menu Choice | Description |
|---|---|---|

| Single Set | Pops up the "Collect"-window for editing parameters of a single data set(see chapter 3.2) |
| Multiple Sets | Pops up the "Collect"-window for editing parameters of multiple data sets(see chapter 3.3) | |
| Index Crystal | Pops up the "Collect"-window with data collection parameters specialized for indexing operations of single crystals(see chapter 3.4) | |
| MAD Data | Pops up the "Collect"-window with data collection parameters specialized for MAD data(see chapter 3.5) | |
| Cancel | Returns to the default layout of the main window |
4.2 Single Set
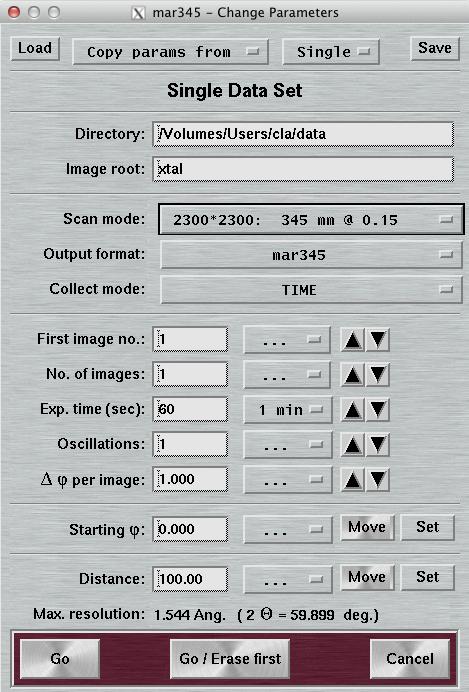
Most of the entries in this window should be self-explanatory and will be explained in the next chapters. When pushing the "Go"-button, the data collection will start using the programmed parameters. It is usually a good choice, to start the program with a clean imaging plate. Therefore, it is recommended to choose "Go/Erase first" if the imaging plate has not been scanned or erased for more than 60 minutes. The "Cancel"-button will bring you back to the default layout of the main window.
4.2.1 Directory, Image Root and Reference Image
- The Directory" receives a suitable name for the directory to store the data. Before data collection starts, the program will check automatically wether data can be written to the chosen location.
- The "Image root" name should be some meaningful string that should allow you to identify your data later on in some way. Usage of blanks or special characters inside the textfield is possible but strongly discouraged.
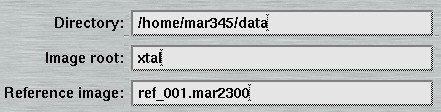
When a valid reference image is given here, it will be applied to process images of the current data set as soon as they become available. Program mar345 for this purpose calls shell script "marreference.sh" which must be present in the executable search path. The script is called with parameters "-r reference_image" and "-i image_file", where reference_image is the name of the image entered here and image_file is the name of the image of the ongoing data collection. By default, the script calls program marreference which essentially subtracts the reference image from incoming images during the data collection. The original image is renamed to bck_image_file and kept in the data collection directory. The file processed by program marreference is called image_file and will be displayed automatically by program mar345 after processing has finished. This technique may play a role for special data collection situations. By subtracting reference images from diffraction images, the net diffraction of a sample will remain in the image assuming that the reference image is collected under EXACTLY the same conditions as the data collection image except for the presence of the sample. As is common for this technique, it is crucial that the reference image and the diffraction image to which it will be applied are on the same scale. If they are not, the resulting image may become useless. While it is possible to use special scaling algorithms to solve this problem, with program marreference we only supply only a simple program that will not do fancy scaling. Shell script marreference.sh may be edited to implement your own procedures that are potentially more clever than program marreference.
4.2.2 Scan Mode, Output Format and Collect Mode
-
The "Scan mode" offers the choices to scan the image plate at 4 differing
diameters at 2 differing pixel sizes. The choice for the diameter to be scanned
depends pretty much on the diffraction power of the sample. At a given
distance, it doesn't make sense to scan the full plate if the diffraction
doesn't do it to the edge. Please keep in mind that the larger the diameter
the longer the scan process takes and the larger the output files are going
to be. Also data processing and data storage takes longer for larger files,
so you don't really want to collect only background.
As far as the choice for the pixel size is concerned, there are 2 concurring
considerations: with 100 micron pixelsize you get somewhat better reflection
profiles and also a slightly increased readout efficiency. The price is
slightly longer readout times and larger file sizes. In 150 micron mode, the
mar345 detector applies "double-sampling", i.e. each transformed
pixel is made up of 2 raw spiral pixels. The physical pixel size of the
raw spiral pixels is rather 75x150 microns. The benefit is that in 150 micron
mode, the real dynamic range is 17-bits (131070), i.e. 2x65635. For strongly
diffracting crystals and for synchrotron the 150 micron mode is likely to
be more appropriate.
The following table gives an overview of scan times and typical file sizes for all 8 scan modes.
Table 1: Scan modes of mar345-detector
IP Diameter [mm] 180 240 300 345 Pixel size [µm] 150 100 150 100 150 100 150 100 File size [MB] 0.7 1.4 3.5 4.0 2.2 6.2 3.5 5.9 Readout [sec] 26 34 39 53 56 77 68 96 Total [sec] 34 42 48 62 66 87 80 108 - The "Output format" currently allows to choose between 3 output formats: the mar345 file format, the cbf file format and the image format as used by the first generation mar180/mar300 scanners. The mar345 formats have been introduced in 1997 and are supported by all major data processing and display programs (automar, marView, denzo, xdisp, mosflm, xds, fit2d, etc.). The cbf file format ("crystallographic binary format") is the definition of a general image data format for the crystallographic community following the CIF-standard as far as headers are concerned. The actual image data are stored using the same compression scheme as used for the mar345 file format ("pck"). The difference, however, is that the cbf-file stores the image data as 32-bit values whereas the mar345 format uses 16-bit values. Since the data range as produced by the mar345 detector exceeds 16-bits, intensity values > 65635 are explicitely included in the mar345-formatted files together with its address in the 16-bit array. While file sizes in mar345 and cbf formats are almost identical, one has to keep in mind that most images don't contain any intensity data > 65635, so using a full 32-bit array is a waste. On the other hand, with today's computer power and memory equipment those considerations are becoming less important. Note that as by early 2004, still very few programs (e.g. mosflm) actually support the cbf format.
- The "Collect mode" offers 2 choices: TIME and DOSE mode. The meaning of this choice is wether the duration of an exposure of the standard mar-goniostat is given as a time (in seconds) or as an X-ray dose as read by the second ionization chamber of the goniostat. For an X-ray source with constant flux (i.e. home generators), X-ray dose controlled exposures are not recommended since time control is always more accurate. On synchrotrons, X-ray dose controlled exposures used to be the typical way of collecting data. With the advent of very high brilliance sources and very stable storage rings, usage of dose controlled exposures on synchrotrons are not longer useful. This is particularly true for short exposure times (< 10 sec). The choice of X-ray dose controlled exposures is only useful if there is a significant variation of X-ray dose within one exposure, which is going to be unlikely for short exposure times and a rapid completion of data collection. Most other affects can be compensated by the data scaling procedure.
4.2.3 Exposure Settings
Here is where you specify the parameters for controlling the exposures of the standard mar-goniostat.
An exposure consists of the following sequence of actions:
- Open the shutter
- Drive Phi over a certain range (Delta-Phi)
- Close shutter
- The "First image no." sets the image number of the first image of the programmed data set. For each following image of the set the number will be incremented.
- The "No. of images" determines how many images will be collected within this set. The time it takes to drive Phi can be either a fixed exposure time or can be controlled by the X-ray dose as read in chamber 2 (see above)
- The "Exposure time"-is usually specified in seconds in TIME-mode or in a frequency for the DOSE-mode. If the latter is selected a Help-button appears in the GUI that will provide help to translate a given time into a suitable frequency. Please also see the comments given above for the DOSE mode.
-
Multiple "Oscillations" are defined as
the following sequence of actions during one exposure:
- Open shutter
- Move Phi over the desired Delta-Phi range
- Close shutter
- Move Phi back to start of exposure and repeat steps 1 to 3
- The "Delta-PHI per image" is the advance of the PHI-axis during one exposure given in degrees.
- The "Starting PHI" is the PHI-position at which the data collection is going to start.
- The "Distance" is the position of the detector translation stage at which the data collection is going to start.
Instead of using the local shutter, it is possible to let the mar345 program cooperate with the MetalJet controller box manufactured by Marxperts. If there is no base attached (keyword IGNORE BASE), it is possible to use the MetalJet shutter directly for time controlled exposures (keywords METALJET ... and SHUTTER JET1). See 5.2.1 Input -> Configuration File -> Keywords for further details.
4.3 Multiple Sets
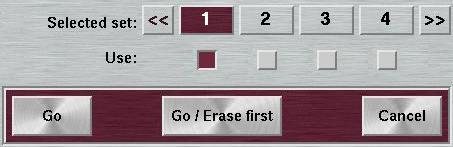
When using "Multiple Sets", the layout of the "Data collection parameters"-window will be slightly expanded by an area of buttons marked 1 to 4 and underneath those buttons a toggle button marked "Use". By pushing one of the numbered buttons of the "Selected sets", a complete set of parameters for a data collection may be programmed. Via the configuration file, the total number of programmable data sets may be modified. It defaults to 8 sets.
By pushing the "Go"-button, the data collections are going to start, but only those data collection sets will be carried out that have been explicitely marked as "Use". This feature allows you to keep parameters for typically used data collections, but select on-the-fly wether you actually want to use them now.
4.4 Index Crystal
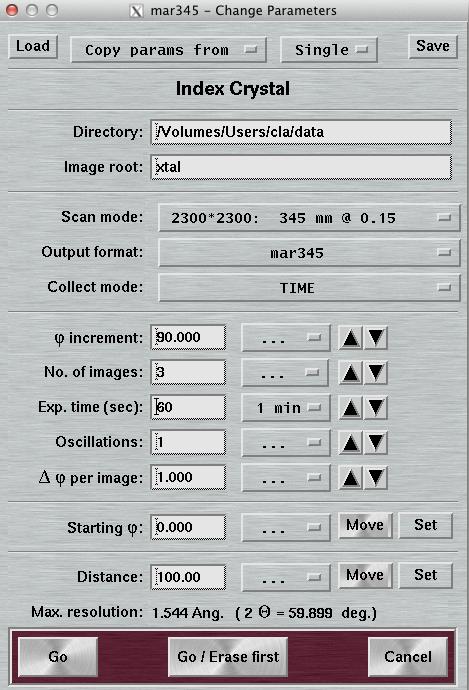
Index Crystal is a special way of collecting data with a PHI movement inbetween each image. This PHI movement is denominated "PHI increment". The purpose is to collect a small number of images at different positions in PHI. This is beneficial for determining accurate cell parameters when indexing single crystal data.
When using "Index Crystal", the layout of the "Data collection parameters"-window will be slightly changed. The text field "First image no." is replaced by the text field "PHI increment". The first image no. will always be 1. Before doing the next exposure, the PHI axis drives to a new value that is "PHI increment" degrees away from the previous image. The image no. for the new image is calculated as: previous image no. + PHI increment/Delta PHI. As an example, to collect 2 images that are 90 degrees apart from each other with a PHI oscillation of 1 degree each one will have to use a PHI increment of 89 degrees.
4.5 MAD Data
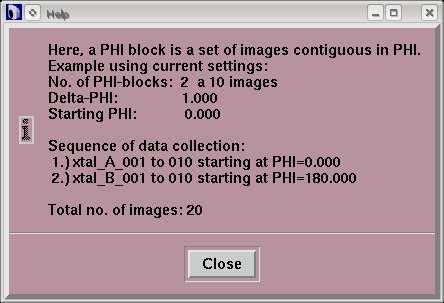
MAD Data is a special way of collecting data for maximizing anomalous signals. In this mode, the data collection is actually 2 blocks of data marked "A" and "B". Each block of data is a series of images that are contiguous in PHI. Inbetween set A and set B there is a PHI movement of 180 degrees.
Set A starts at "Starting PHI", set B at "Starting PHI" + 180 deg.. The first PHI-block of images will be in set A, the second one in set B, the third one also in set B, but at "Starting PHI + (images/block)* Delta-PHI + 180 deg.", the fourth one again in set A at "Starting PHI + (images/block)*Delta-PHI", etc..
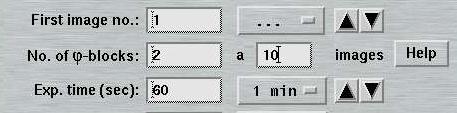
When using "MAD Data", the layout of the "Data collection parameters"-window will be slightly changed. The text field "No. of images" is replaced by the text field "No. of PHI blocks". For each PHI-block the number of images has to be given in the field on the right. To obtain the total number of images to be collected, just multiply the number of PHI-blocks by the number of images per PHI-block. To alternate between both sets, use 1 image per block. Note, that the smaller the number of images per PHI-block the more PHI movements are required. For further illustration, use the Help-button in the window.
4.6 Load, Save & Copy Parameters
4.6.1 Load Parameters
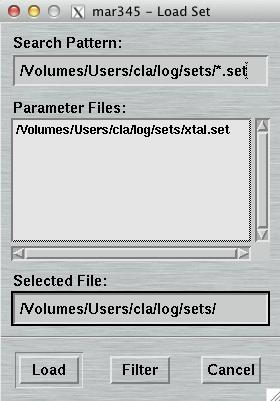
The "Load Parameters"-window can be accessed by pushing the button
"Load" in the upper left corner of the
"Data collection parameters"-window.
Within this window, you may select a file with data collection parameters. The format of this file is described in chapter Parameter File of section Input. This feature comes handy for loading parameters typically used for collecting data of a certain sample and saves you lots of typing.
The default place where to store and to load parameter files from is $MARLOGDIR/sets
4.6.2 Save Parameters
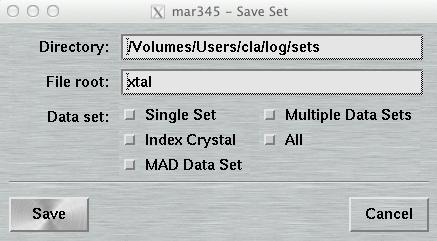
The "Save Parameters"-window can be accessed by pushing the button
"Save" in the upper right corner of the
"Data collection parameters"-window.
This window is used to store parameters from your current program session. You may may either save only the set that is currently in work or all sets at once. The format of this file is described in chapter Parameter File of section Input.
The default place where to store and to load parameter files from is $MARLOGDIR/sets
4.6.3 Copy Parameters

You may copy parameters from one data set into another data set. You may either copy parameters from current set into any other or copy parameters from any set into the current. This methods allows for quickly program multiple data sets with almost identical conditions. For this purpose, select from the option menu at the top of the "Data collection parameters"-window either "Copy params from" or "Copy params into" and then either one of sets 1 to 8 of multiple data sets or the single data set. Please note that at the time where you make your choice the data will immediately copied from the origin window to the destination window.
4.7 IuS Options
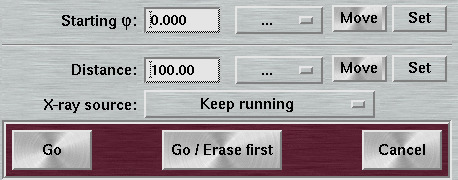
The program version that supports Incoatec's IuS generator offers an additional choice in the "Single Set" and "Multiple Set" windows underneath the field for setting the distance. You have a choice for telling the X-ray source to lower power and go into STANDBY mode or turn the generator off alltogether at the end of the data collection. The default is to keep the X-ray source as is.